Category Archives: Teaching ideas

The Return of Random Power Point Presentations

You might remember the classroom activity that I call ‘Random Power Point Presentations’ – if not, you can read about the original idea here and see some sample presentations here.

In the original challenge, the students had advance warning of the topic but no idea what was going to be on the slides. In this new version of the activity, it’s the other way around: the students receive the five slides of their presentation the day before class, but are only told what the topic of the talk is a few minutes before they have to give it!

Hang on. How can this possibly work? If they can see the slides, can’t they work out what the topic is? In this case, no. See for yourself. Here is the image that I posted for the students to see the day before the lesson:

most people think

I deliberately looked for the kind of generic images that could be applied to any topic. As for the five-slide structure, it represents a simple rhetorical progression, attempting to guide the audience from a state of honest misapprehension to one of enlightenment, signing out with a fairly crude action-point. (You can tell I’ve sat through a fair few late-night infomercials in my time…) I posted these instructions alongside the image:

most people think instructions

In class the next day I put the students into groups of three. Each group would have 25 minutes to prepare a short 2-3 minute presentation, with each person having to speak at some point during the task. The presentation titles were already written on slips of paper. Each group drew a title out of the hat and read it out loud. There was quite a bit of laughter because – naturally – I had chosen some very weird titles. Here they are:

‘The end of the rainbow – closer than you think’
‘Polar bears in space – the final frontier’
‘Too much cheese’
‘A dollar a day – hey! hey! hey!’
(There was also another one about zombies, I think, but I can’t remember the title of that one)

The presentations were every bit as creative and imaginative as I had hoped they would be. For example, the group who had the bizarre topic of ‘Too much cheese’ had the clever idea that CHEESE was an acronym (C = cocaine, H = heroin, E = ecstasy etc.) and turned it into a drugs awareness talk. Brilliant.

I like this activity a lot. The coherence of the 5-slide structure not only helps the speakers navigate their way through their talk, it also adds a dash of style. The three slides in the middle (most people think – most people forget – what you need to remember) were my attempt to incorporate a rhetorical technique which is sometimes described as ‘set-em-up-and-knock-em-down’ – in which the speaker intensifies the eventual impact of the message (‘what you need to remember’) by first making the audience wait while s/he briefly considers a commonly-held argument before revealing its flaws (‘most people think’ – ‘most people forget’).

It occurred to me that this 3-step progression could also be a good planning tool for writing assignments, especially the kind of pro/contra essays which often feature on exams. In my experience, the problem many students encounter when faced with an opinion-based assignment is that they run out of things to say. And why? Often it’s because they get to the point too quickly – in other words, they start with ‘what you need to remember’ and ignore ‘most peole think’ and ‘most people forget’.

A simple worksheet using the 3-step structure can help students plan more effectively and develop their ideas and arguments. Here are some examples, from an intermediate-level group. I wonder if the students would have reached the same conclusions if they had considered the topic in a less structured way? What do you think?

12f learning english

12f getting good grades

12f hungarian football

Netherlands handouts

Greetings to all the teachers attending the OUP events in Amsterdam, Apeldoorn, Tilburg and Rotterdam.

The handout for my first session on ‘Study skills and critical thinking’ is available here.

The handout for my second session on ‘Bringing lessons to life’ is available here. No here. I mean here.

It’s been a fun tour.
2013-11-04 11.53.40

English Teachers’ Day, Luxembourg

I enjoyed the challenge of getting to grips with the topic of ‘critical thinking and study skills’ from a language teaching perspective. My tech-savvy students certainly know how to get hold of information; what they do with it once they have it is another question altogether.

The session looked at some practical examples of how we can use the context of an EFL lesson to initiate a discussion about how we think and how we study. I approached the topic in class with puzzles, dilemmas and brainteasers, which I have found to be an excellent method for encouraging students to examine their own thinking and decision-making processes.

Links and references can be found here

There is also a handout with some (but not all!) of the classroom activities that we looked at.

And this?
water
This is water.

Success at speaking – grandmother saves the day

True story. I was called in at short notice to cover a class for an absent colleague towards the end of the last school year. The students were 12th graders – 18 years old – and so had their final exams in English looming. It soon became apparent that they were counting down the days to the exam with the kind of enthusiasm that you might muster for a trip to the dentist’s.

These students were not academic high flyers; they were simply looking to get through the B1-level test in one piece. They were shy, reluctant to speak and unsure of their English. Hmm. I only had 45 minutes – and after that we were unlikely ever to have another lesson together. What to do?

It was too late to back out of the door and slither away down the corridor. I suggested we take a look at exam speaking tasks and topics. They agreed – which is to say they shrugged and looked at the corner of their desks, being careful not to catch my eye.

And so we began by looking at some of the topics that come up on the speaking test.

Now the bad news for students is this: you cannot get significantly better at English in the course of a single lesson. The good news, however, is that you don’t have to. Something we can achieve in 45 minutes, on the other hand, is to demonstrate to weaker students that 1) they are good enough and 2) they need not be afraid of the exam tasks.

The topic we were discussing (OK, I was discussing) was healthy living. What can you tell me about young people’s diets?

The answer, it turned out, was not very much. When students believe that their spoken English is poor, getting them to speak can be extremely difficult. What they needed was encouragement. Correct their mistakes? Why? It was much too late for that. Instead of reinforcing their own sense of insecurity, I wanted to give them a bit of confidence.

‘Communicate your ideas – don’t worry about the mistakes. You’re allowed to make mistakes.’

Oops. I said the ‘I’ word. That’s the other big problem in situations like this. Ideas. Students can have absolutely no idea what to say when they have to talk about a topic such as diet and healthy living – not even in the mother tongue.

Typical attempt: ‘Young…people…eating…lot of…fast…food…’ Then phut – it’s like the tank is empty and there’s nothing left to say.

‘Write this down,’ I said, and went over to the board and wrote: My grandmother always says…

Then we tried it again. This time, they had to start their answer with My grandmother always says… – that was the rule. And it didn’t matter what their actual grandmother did or didn’t say.

And what was the outcome? Well, the difference that grandmother made was startling. First of all I think we can agree that ‘My grandmother always says young people eating lot of fast food’ is a much better answer than ‘Young people eating lot of fast food.’ It’s personalised, creates an authentic-sounding context, and adds an element of structural complexity which enhances the linguistic merit of the utterance as well.

There is something else, though. Something much more interesting. What I’ve found is this. As soon as the words leave the students’ lips, they have an idea of what to say next. Suddenly the possibilities are obvious. There is somewhere for the answer to go.

Even better, the beauty of grandmother is that she is surprisingly – and consistently – successful at transforming platitudes into memorable answers. Take your dullest, driest exam questions (‘What is your ideal holiday?’, ‘Do you prefer the cinema or the theatre?’ ‘Why is it important to learn foreign languages?’) and give them the grandmother treatment, and you’ll find that after a while the students start to smile – and then to speak.

The lesson ended and I wished the students luck. And I never taught them again. Occasionally, however, I’d pass them in the corridor or stand behind them in the dinner queue. One of them would always give me the thumbs-up and smile: ‘Sir! My grandmother always says…’

They had discovered they were good enough – and it was all thanks to grandmother.

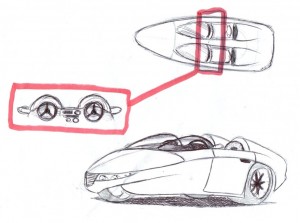
The twin-steer car: a lesson in resourcefulness

A while ago I was called in at short notice to cover a lesson for an absent colleague. As we know, there are various ways of handling these situations, but because I was familiar with the coursebook that the group was using, I decided not to do an unplugged lesson but rather to go in and use the book as a starting point. My idea was to do a few communicative activities to revise the most recent topics and vocabulary.

At our school everyone learns English, but different class groups have different ‘profiles’. This particular tenth-grade class has extra classes in Art and Design, and I noticed straight away that one of the guys sitting near me was doodling absent-mindedly in his notebook as I took the students’ names and did all the admin at the start of the lesson. ‘Aha – an artist!’ I thought, but said nothing.

Then I began teaching. I got a fairly good response from the students, who were quite active and willing to talk. One student seemed quite reticent, though, a little bit uncomfortable, even. Which one? The doodler. He still had his notebook open, but he clammed up whenever he was supposed to speak or make a contribution to the lesson. I gave him a long, quizzical look (I was really just trying to decide what to do) and then I saw him move apologetically to put his doodle-filled notebook away. That’s when I got the idea.

“No, it’s OK. The others can do this task. I’ve got a special job for you. I want you to draw me something.”

“What?”

Actually, I had no idea what I wanted him to draw for me, I just thought it had better be something a little bit out-of-the-ordinary. So I said the first thing that came into my head:

“I want you to design me a car with two steering wheels.”

And that’s exactly what he did. For the next twenty minutes he was totally absorbed in his task, drawing away happily as the lesson hummed and coughed around him. Occasionally he looked up at me cautiously to see if it really was OK for him to be sitting there drawing instead of getting involved in the lesson. I caught his eye  and just nodded to indicate that everything was fine.

This is what he drew:

(You can click on the image for a closer look.) Now I think this is brilliant. As you can imagine, I told the  student what a great job he had done and showed the sketch to the rest of the group. Then I got him to explain his design in a few sentences. Everyone listened – and helped out with vocabulary, too, when he got stuck. When the bell rang for the end of class, it felt like the lesson had not been a waste of time for anybody.

And that might have been the end of it.

I kept the sketch, actually carried it around inside the notebook I always take to lessons. From time to time I looked at it and smiled. I wanted to use it in some way – it was too good just to chuck in my desk drawer and forget about. I just didn’t know what to do with it.

Time passed.

Today I taught my eleventh graders. I asked them to do three things.

1. Warm-up. Think of a radical new car design.

I got some interesting ideas. Here’s one:


These students are the scientists and engineers, as you can probably guess. There were plenty of other great ideas, ranging from rotten-veggie-powered cars to design-it-yourself ‘skateboard cars’. There was even an idea for an i-Car – “using the iCar app you can just swipe the i-Key to start the engine.” Pretty impressive, I thought 🙂

2. Look at the picture. What is it? What do you think about it?

Then I showed them the picture of the twin-steer car that I had been carrying around with me all this time. My original, idle request for a car with two steering wheels had been just that: idle. My students, however, saw all sorts of possibilities in the design:

3. Then came the main focus of the lesson: a writing task based on the twin-steer car design, which also allowed students to practise producing the kind of texts commonly featured in the writing section of language exams – which is it what they are all preparing for, of course.

I showed them this slide:

I’ll leave you with a selection of the students’ efforts, in extract form.

A review:

A for-and-against essay:

A letter of complaint:

A couple of marketing leaflets, which I’ll reproduce in full. Click on the images for a more detailed view:

Some wonderfully witty and original pieces of work here. A car that runs on the energy created by the shattering of childhood dreams – did you see that? Brilliant. How interesting to reflect that if a few months ago in class I had told a certain doodling artist to put his pad away and pay attention none of it would have been possible in the first place.

The real lesson of the twin-steer car is not to rush to judgement. The doodling student who seemingly made little meaningful contribution to my lesson in fact produced the very materials which subsequently inspired an impressive selection of top-quality work from another group of students.

Keeping an open mind in the short-term about the supposed ‘usefulness’ of our students’ contributions to one particular lesson can unlock a fantastically rich potential palette of student-produced materials for use in the long-term, provided we are resourceful enough to notice that potential and then to carry it around with us until we work out what the next step is.

Adapting the ‘Flame Challenge’ to reading comprehension

What is a flame? Why is the sky blue? Why is it hot in the summer and cold in the winter?

If you’ve ever been asked such a question by one of your young students – or indeed, one of your children – you will know how difficult it can be to give a satisfactory answer. Not only do you need to have a fairly solid understanding yourself of the phenomenon you are trying to explain (not always a given in my case!) you also need to be able to communicate that information clearly. Whenever I try to give an authoritative answer to a question like this I often just succeed in getting all tangled up myself.

There is an aphorism (usually attributed to Einstein, I think) which suggests that if you can’t explain something to a child, you don’t really understand it yourself.  I’m inclined to agree. It’s great to see that there are some boffins out there who have accepted this challenge quite literally: the Flame Challenge is an interesting project in which scientists have to provide eleven year-olds with meaningful and comprehensible answers to questions such as “what is a flame?” This is a competition in which the jury is made up of smart eleven year-olds and the competitors are top scientists. I like it.

I’ve recently started applying the basic premise of the Flame Challenge to reading comprehension with intermediate and upper-intermediate students. Here’s how it works.

1. We tackle a text from the coursebook in the usual way, not only reading the text and discussing it, but also completing all the accompanying reading comprehension questions and language-awareness activities.

2. Then we focus on one particular section of the text, usually a paragraph. Here is an example:

Taken from insight intermediate (OUP) p68


3. I then tell the students to imagine that a smart eleven year-old has come up to them with this paragraph and said ‘I don’t understand this.’ Their job is to isolate what they consider to be the key information contained in this paragraph and explain it in terms that the imaginary eleven year-old could understand. They have to put their explanation in writing.

That’s it. In theory the task is very simple: prove you understand this paragraph by explaining it in language that a child could understand. In practice, however, it is much more difficult. My students’ initial strategy (not surprisingly, I might add) was to replace all the long words with short words and to turn each long sentence into two shorter ones. The imaginary eleven-year old was not impressed.

The secret to doing this task well is to be creative: students need to be encouraged to use their imagination as well as their English. That means taking the main ideas of the paragraph and reformulating them in a way that connects with the intended audience. Or if you prefer, it involves taking the nuts you’ve been given, cracking them, getting rid of the shells, adding some more ingredients and turning them into peanut butter. Eleven year-olds can relate to peanut butter 🙂

Here are two examples using this more imaginative strategy that were done by my students:

Explaining ‘stealth marketing’ to an eleven year-old: playing the chocolate card!


As you can tell from the next one, my students are now finding inventive ways to use flowcharts when I don’t even expect it!

Explaining ‘stealth marketing’ to an eleven year-old: goin’ with the flowchart


Now I think I’ll get them to help me understand a few tricky concepts: What is a flame? Why is the sky blue? Why is it hot in the summer and cold in the winter? 🙂

Snake in the class

An imaginative way of using classroom name charts to motivate young learners.

It can be quite a challenge to keep young learners focused and engaged during the English lesson. Even with a carefully-chosen coursebook and a well-planned lesson full of stimulating activities, children’s attention can wander and their willingness to get involved can wither – especially if they have just put their hand up to answer a question yet again but the teacher has called on somebody else yet again!

If only there was a simple way to reward diligent children and encourage active students to keep up their good work without interrupting the flow of the lesson…

Good teachers know how important it is to praise and encourage their students as much as they can. By making children feel good about themselves as language learners –  and as people – we are helping them to become more motivated learners. A warm word of praise and an encouraging smile can work wonders to help children relate positively to the learning situation. This positive attitude will help each time they enter the classroom. But it needs to be sustained. We need something tangible that appeals to each individual learner and which does not fade away.

I’ve been using a simple poster-colouring technique for years. It really gets children inspired to do as well as they can in class and also allows the teacher to keep an informal record of how actively children are getting involved in the lesson.

Here’s how it works. Create a snake poster for display in the classroom. It should be big enough for everyone to see, durable and portable – especially important if you have your lessons in different classrooms and need to carry your things around different rooms in the school. Use A3-size card and punch a couple of holes in it which can be threaded with yarn. You can then hang it anywhere you like in the classroom.

You need to make one snake for each child in the group. So if there are fifteen kids in the class you need to draw fifteen snakes on the poster. Draw a long snake for each child, complete with triangular body sections. The more sections you have, the longer the poster will last. I normally have about 30 sections per snake. Make sure that you write the name of a different child next to each one of the snakes. And that’s it – the poster is ready to make its appearance in class.


Take the poster to your next lesson and show it to the children. They will be intrigued – especially when they see their own names. Tell them that the snakes would look much better if they had some colour. Explain that the kids will have the chance to make their own snake more colourful bit by bit. Tell them that whenever you want to reward someone for good work in class, you will say “come and colour!” and that person takes a colour pencil, comes out to the front of the class, colours in a segment of their own snail’s tail, and then goes and sits back down. You carry on teaching.

So when exactly do the kids come and colour? It’s up to you. You can reward anything you like, you might even decide together with the class what kinds of things you are hoping to see from them. Be generous and imaginative. Keep an eye open for small things that you can praise: neatly written homework, a correct answer, beautiful singing, great chanting, patient waiting, playing by the rules, helpful behaviour – anything you want to single out for praise.

Use it to highlight the kinds of values you want to promote in the class by inviting children who do something fair, honest, helpful or kind to come and colour. You can tailor it to your students’ needs, for example by rewarding the more timid kids whenever they get actively involved. In the same way, saying “well done – come and colour!” to a child with discipline problems who has just behaved really well during a lesson is a simple yet meaningful way of signalling to that child that you have noticed their effort – and value it.

The best thing about this technique is that it does not slow the lesson down. You just shout out the names of the kids who get to come and colour and continue as before. They won’t need telling twice! Kids love coming up to the front, and really look forward to getting the chance to colour in another segment. They can come up in pairs or threes if several of them deserve praise for something, and there’s no reason why the same child should not have the chance to “come and colour” more than once in a lesson. You can make it as frequent or as infrequent as you think is appropriate.

Establish this as a routine. Continue it from lesson to lesson, always carrying the poster with you to class. You and the children can monitor the growth of the colour tails. It’s a great way to motivate them further – and also provides you with an ongoing tool of informally recording levels of effort and activation.

Much better to have a snake in the class than a snake in the grass! 🙂

Left, Right, Left, Write

We’ve reached that time of year when everyone is tired. It’s been really hot outside the last few days, which just seems to make the students even more lethargic. Summer is close enough to believe in but too distant to get excited about. I see heads starting to droop. Earlier this week I set a homework task from the workbook: TWP, i.e. they had to do The Whole Page.

There was one particularly pained face, and I heard a stifled groan.

“What’s the matter?”

“The first one. I hate exercises like this.” The first exercise practised writing numbers and dates as words, admittedly not much of a crowd-pleaser.

What to do?

“OK, are you left-handed or right-handed?”

“Right.”

“Then do it with your left hand.” A wry smile of agreement.

Today we checked the homework. I wrote some of the answers on the board as we went through it. Yes, it’s “nineteen ninety-five” if you’re talking about the year, but “one thousand nine hundred and ninety-five” if it’s a quantity. Not so fast, teacher – a hand went up.

“Sir – why aren’t you using your left hand?”

Busted. I switched hands and continued to write, the words on the board immediately suffering an embarrassing downgrade to sprawling semi-legibility. I soldiered on, switching hands after every answer in a determined attempt at ambidexterity.

Then I checked the workbook of the student who had gamely accepted my challenge.

What a trooper. It looks like it was written by the frostbitten fingers of Captain Scott in the middle of an Antarctic blizzard! I certainly admire his tenacity – which of course itself was worthy of a ‘plus point’ 🙂

An interesting conversation followed. Do right-handers have it easier? Are scissors, door handles and the computer mouse all examples of subtle discrimination against left-handed people? There are three lefties in the group, none of whom thought it was a serious problem. They said they all have to use scissors with their right hand, though.

I’m not sure I’ll be asking students to write with ‘the other hand’ on a regular basis – mainly because it’s so difficult 🙂  – but it was an interesting way to relieve the tedium by doing things slightly differently. I also managed to squeeze the word ambidextrous into the lesson, which can only be a good thing.

Random Power Point Presentations

A number of people have asked for more information about the Random Power Point Challenge activity, which has proven to be quite popular. In the first entry I described how I use this activity with gifted students. For this entry I’ve added some thoughts about using the Random Power Point Challenge in a rather less daunting way. I’m also uploading some of the presentations themselves.

The original challenge – difficult!

The presentation consists of ten slides and is titled ‘Noticing trees more effectively – a beginner’s guide’. That is all the students are told. They have ten minutes to prepare. The slides contain a combination of images and bullet points, most of which have precious little to do with the topic. Here is an example.

To make it even more challenging, I threw in a few unexpected instructions which required the presenters to perform various tasks mid-presentation. On one slide they are told to adopt a strong Hungarian accent. On another slide they are even told that they have to talk about trees for a few moments in another foreign language (i.e. a language other than English and Hungarian). There is also a story about trees that they have to improvise based on visual prompts. In short, it’s tough!

You can download the complete presentation here: noticing trees more effectively

Have fun with it. Adapt it according to your needs and preferences and try it out in class. Do let me know what you think about it, too!

Describing your weekend

It occurred to me that we could use a tamed and “de-clawed” version of the Random Power Point Challenge to make the tired old classroom activity of describing what you did at the weekend more enjoyable. The recurring problem I have with asking my teenage students to describe what they did at the weekend is  1) they don’t want to  because 2) it’s none of my business.

Here’s one solution. Create a power point presentation called ‘What I did at the weekend’ and fill it with images recognisably connected to common free-time activities. Students have to improvise a plausible narrative based on the images that come up (coffee – radio – dog – walking – telephone call – football match etc.) Although some improvisation and creative story-telling skill is required, the task is straightforward and manageable – and certainly nowhere near as daunting as  ‘Noticing trees’. Another advantage is that students are able to demonstrate an ability to describe events in the past without having to compromise the privacy of their own lives.

You can download the complete presentation here: What I did at the weekend

Your comments and feecback are welcome.

Starting gently – food and drink

Finally, I thought that the Random Power Point Challenge could also be used at elementary level as a high-adrenaline activity to revise a topic area or practise speaking skills.

Tell the students they should revise a topic area that you have covered in class – for example food and drink. Tell them that in the next lesson one of them will have to do a 10-slide presentation on the topic. The slides will contain both pictures and prompts. No nasty surprises. At this stage the students do not know who is going to have to give the presentation, so hopefully they will all go home and revise 🙂

In the lesson choose a student at random or encourage someone to volunteer. In this case, the slides provide the students with relevant ideas and useful language.

You can download the complete presentation here: Food and drink

What do you think?

Going with the flow – using flowcharts in the classroom

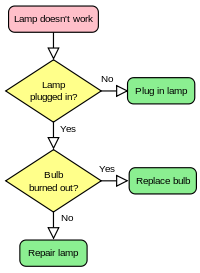
Flowcharts are traditionally used to represent an algorithm or process. You have a series of boxes which are organised sequentially and connected with arrows, allowing you to trace a path through a series of steps or questions, leading to a specific outcome or solution to a problem. The example on wikipedia looks like this:

Nerd heaven. Recently I’ve seen quite a few witty flowcharts online, the kind that can make you smile by applying the rigid formality of an algorithm to a facetious or pseudo-existential question. Like this, for example, which I found here:


There is even an algorithm designed especially for teachers confronted with the eternal dilemma of what to do when students ask to go to the bathroom, designed by Amanda Heyn:


I thought that it might be interesting to get students to create flowcharts of their own. As well as being an enjoyable and challenging activity, there are real language learning benefits as well.

Consider this: a lesson from OUP’s insight dealing with the easily confused verbs say, speak, talk and tell.

The coursebook encourages students to read the dictionary entries for the given words. Follow-up questions focus their attention on the tips on usage provided in the dictionary entries.


The students can comprehend this, but do they really understand it? I wanted to get students engaging with this information more actively, and decided to use flowcharts as a way of helping them to appreciate the nuances governing the correct usage of the four verbs.

So I used three of the questions in exercise 3 as the basis for a flowchart helping students to determine which verb to use:

Choose a verb. Follow the flowchart. Does it work? Great. Choose another verb and start again. It seems to me that the decision-making procedure inherent in the algorithmic approach engages students’ cognition in a challenging and appealing way.

The next step was to ask students to see if they could create a flowchart of their own – using the remaining questions from exercise 3 – to solve the same usage dilemma. Here is one of the results:


Not all students have minds  that work as systematically as this, but those who do enjoy thinking about language analytically will certainly enjoy the challenge of representing language usage rules algorithmically. Try it out!

Another great advantage of flowcharts is their visual appeal and interactivity. When students have completed a flowchart, it can be passed around for others to try out. When displayed on the classroom wall, you can be sure that other students will notice it and engage with it.

For a more light-hearted activity, ask students to think of a ‘big question’ or dilemma and to design a flowchart. The results are often hilarious. I will leave you with two from my own students:

Do I have cookies?

Do I have cookies?


Should I do this flowchart?

Should I do this flowchart?